
Many Odoo bank reconciliation problems start with entering the wrong opening balance during the first bank statement import. This mistake affects all future reconciliations.
As a CPA and IRS Enrolled Agent who has set up Odoo for various businesses, I have seen common mistakes cost teams a lot of time fixing issues. Common problems include choosing the wrong reconciliation method, misconnecting accounts, and letting the suspense account fill with unchecked transactions. By the time anyone reviews, the Odoo book balance and the actual bank balance can drift apart.
If this issue remains unresolved, it can lead to untrustworthy financial decisions and a lengthy cleanup at year-end. Auditors will also ask questions that no one can easily answer.
This guide is what I would provide to a new client on day one. By the end, you will know which reconciliation method fits your business, how to set up Odoo correctly, how to automate tasks, how to fix common errors, and when to seek help with reconciliation.
Let’s start by explaining what bank reconciliation is in Odoo and the key configuration choice that will impact your next year of closes.
Key Takeaways
- Invoice automation in Odoo isn’t just “faster invoicing”—it links sales orders, payments, vendor bills, and bank feeds into one continuous flow where invoices are generated, sent, matched, and reconciled with minimal human input.
- AI-powered OCR is the real time-saver for vendor bills. Once Odoo has seen a few invoices from the same supplier, it effectively “learns” that layout, cutting manual entry by up to 90% for future bills.
- The biggest ROI often comes from workflow automation, not just data cleaning and capture. Approval routing, exception handling, and automated reminders eliminate the email back-and-forth that usually slows AP and AR to a crawl.
- Odoo’s pay-per-scan OCR model makes automation scalable. At roughly $0.10 per invoice, even a few hundred bills a month cost less than a few hours of manual data entry from your accounting team.
- The real question isn’t whether Odoo can automate invoices—it’s how long you can afford to keep doing it manually. For teams spending 5+ hours a week on invoicing tasks, even a basic implementation usually pays for itself within months.
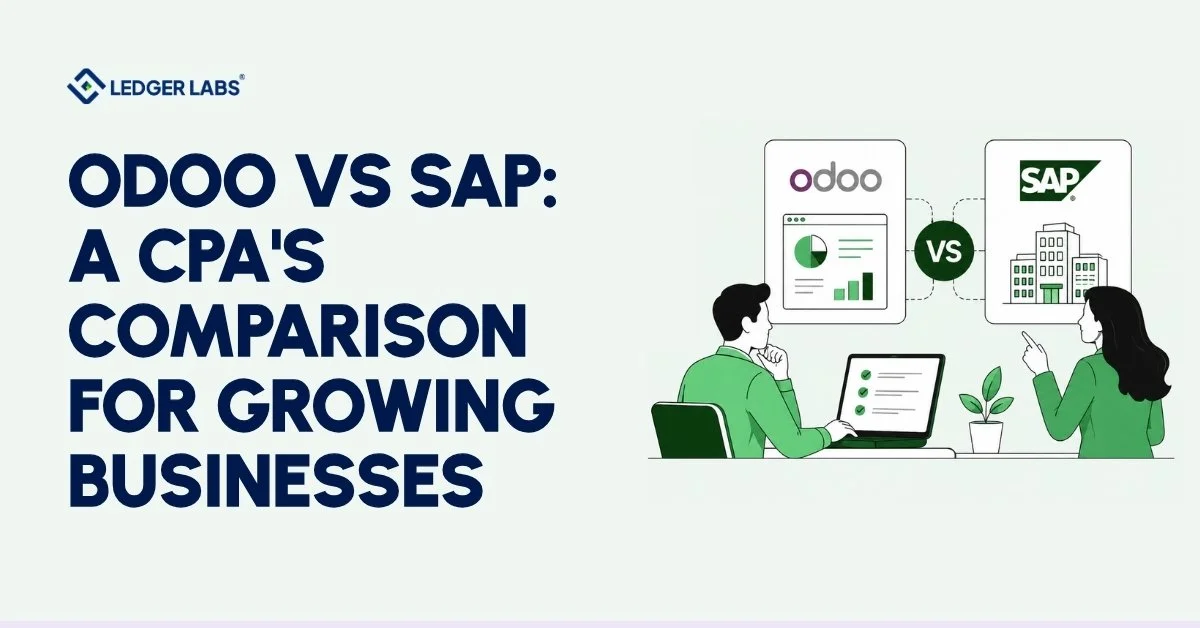
What Is Odoo Bank Reconciliation (and the One Setup Choice That Creates Months of Mismatches)?
Bank reconciliation in Odoo involves matching bank transactions with your accounting records, such as invoices, bills, payments, and journal entries. This ensures your book balance accurately reflects your actual bank balance. When you import a statement, Odoo cannot identify what each transaction means.
For example, a $2,500 deposit could be a customer payment, a refund, a loan, or an owner contribution. Reconciliation helps clarify each transaction in Odoo and keeps your cash balance aligned with the bank’s balance.
Before you begin matching transactions, you must decide between 2-step and 3-step reconciliation. This choice impacts your audit trail and how quickly your team can resolve discrepancies.
A poor choice can lead to mismatches between your book and bank balances, making investigations time-consuming. Many reconciliation issues we see at Ledger Labs come from early setup decisions made without understanding their impact.
Carefully consider your choice. Let’s look at both methods.
2-Step vs 3-Step Reconciliation: Which Method Fits Your Business?
Odoo offers two reconciliation methods, and picking the wrong one either doubles your workload or leaves you without the audit trail you’ll need later.
The 2-step method is the direct route: bank statement → match straight to invoice or bill. There’s no intermediate payment record.
You’re telling Odoo, “This bank transaction is the payment.”
- When to use it: simple workflows, fewer than 100 monthly transactions, no audit obligations, mostly instant payment methods (credit cards, ACH, wire transfers).
- Pros: fewer journal entries, faster reconciliation, less cognitive load.
- Cons: no separate “payment registered” record, limited visibility into payments in transit, weaker audit trail.
The 3-step method adds an intermediate layer: invoice → register payment in Odoo → match that payment with the bank statement.
Outstanding accounts (also called transit accounts) track payments that have been recorded in your books but haven’t yet cleared the bank.
- When to use it: detailed payment tracking, higher volumes, audit requirements, instruments that take days to clear (checks, batch payroll, international wires).
- Pros: full visibility into cash timing, clean separation of “recorded” vs “cleared” payments, the audit trail any reviewer will ask for.
- Cons: more clicks per payment, requires you to understand and maintain the outstanding accounts.
Both methods are part of any well-built Odoo bookkeeping workflow; the question is which one fits where your business is right now.
Which method should you use?
Ask one question:
Do you need to track the moment you issue or receive a payment separately from the moment it clears the bank?
If yes, you write checks that take days to clear, you process payroll that hits employee accounts at different times, you receive customer checks that sit in deposits-in-transit for a week, go with the 3-step. If you’re mostly dealing with instant payments and your transaction volume is low, 2-step will save you time without costing you anything material.
Most businesses with revenue under $2M start with a 2-step process and transition to a 3-step process as they grow. You can change methods later by adjusting your bank journal’s reconciliation matching rules, but it’s easier to start clean than to convert mid-period.
How to Set Up Bank Reconciliation in Odoo (4 Steps)?
You’ve picked your method, now configure Odoo so your first reconciliation works. Most setup frustrations happen because users skip the prerequisites or misconfigure the opening balance. Follow these four steps carefully, and you’ll avoid the most common pitfalls.
Prerequisites checklist (Community vs Enterprise)
Before you touch the reconciliation module, verify:
- Edition clarity. Odoo Enterprise users get full reconciliation features natively. Odoo Community users need to install the OCA account_reconcile_oca module. As of Odoo 17 and 18, the native reconciliation UI was removed entirely from the Community Edition, so the OCA addon isn’t optional; it’s required. If you’re on Community v17 or v18 without the OCA module installed, you won’t see the reconciliation widget at all.
- User permissions. “Accounting: Accountant” role minimum. “Billing” role users can’t reconcile.
- Bank account created in your chart of accounts. If you haven’t set this up yet, work through the chart of accounts in Odoo first.
- Chart of accounts configured for your region. If you’re at this stage and haven’t completed your initial Odoo setup, see our guide on how to set up Odoo ERP.
Step 1: Connect your bank account (Yodlee, Plaid, SaltEdge)
Navigate to Accounting → Configuration → Banks → Add a Bank Account.
1. You have two paths:
2. Automated synchronization (Enterprise users only)
- To connect your bank, find it, and click “Connect”
- Authorize the link with Odoo’s providers.
Note: In North America, Odoo uses Yodlee; Plaid is another option in the US, and SaltEdge is for European banks, depending on your region. After authorization, transactions are imported daily with no effort on your part.
3. Manual import
- Alternatively, click “Create it”
- Enter your bank details
- Upload statements in CSV, OFX, CAMT, CODA, or QIF formats
Note: Most US and Canadian banks support at least OFX or CSV. We’ll discuss format selection in the next section.
Step 2: Configure bank journal settings
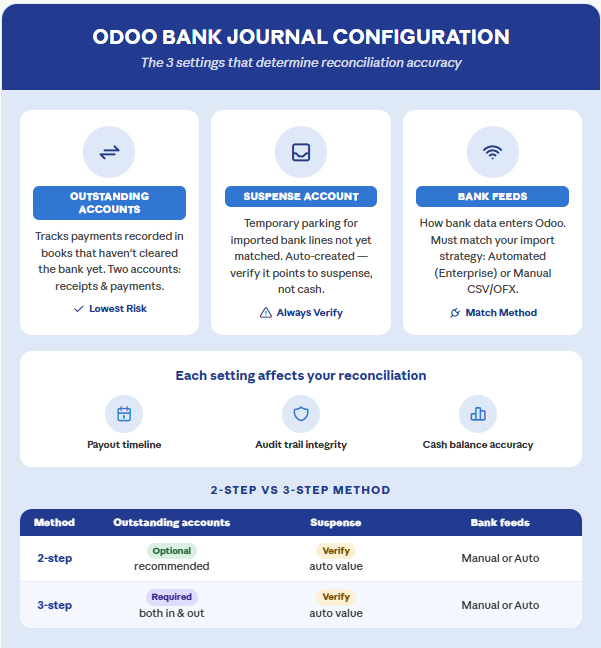
Click the newly created bank journal, then the configuration (gear icon). Three settings matter most:
1. Outstanding accounts
Set separate accounts for outstanding receipts and outstanding payments. These are required for the 3-step method; if you’re on 2-step, you can leave them at defaults, but it’s still cleaner to set them explicitly.
2. Suspense account
- Odoo creates this automatically.
- Verify it’s set to “Bank Suspense Account” and not pointing at a real cash account.
3. Bank feeds
Choose “Undefined yet,” “Automated,” or “Manual” based on Step 1.
Step 3: Import your first statement
Go to Dashboard → Your Bank Journal → Upload Statement.
Tip: Your opening balance matters most. Many issues at Ledger Labs arise from incorrect opening balances. Ensure your Odoo book balance matches the bank’s starting balance from your cutover date. If you see discrepancies, check the “Opening Balance Mismatch” in Common Errors.
- Upload the file
- Verify the transaction count matches the statement, and click Import
If you handle multi-currency operations, the FX conversion happens at this stage. See our multi-currency reconciliation guide for the rate-source configuration that prevents conversion errors.
These steps work consistently across Odoo 17, 18, and 19; the menu paths are identical. Where they diverge, I’ll flag it in line.
Step 4: Access the reconciliation dashboard
Click “Reconcile Items” on your bank journal card. The dashboard has three regions:
Left panel: unmatched bank transactions waiting for action.- Right panel: tabs to match existing entries, create manual entries, or handle batch payments.
- Top panel: the resulting journal entry that appears when your match is valid.
If you see the dashboard, your setup is working. If you don’t, typically on Community Edition without the OCA module installed, fix the prerequisites and try again.
Choosing the Right Statement Import Format (OFX, QIF, CSV, OCR)
The format you choose for statement import determines how much manual cleanup you do each month. Most US small-business owners default to CSV because it’s familiar, and most spend extra hours every close fixing parsing issues that wouldn’t exist on a better-structured format.
Here’s the tier list for US businesses:
Tier A - Use this first: OFX
OFX (Open Financial Exchange) is the format you want. It’s a structured banking standard with explicit fields for transaction date, amount, type, payee, and reference number. Odoo’s parser handles it cleanly, dates are unambiguous, and transaction types come pre-categorized, so reconciliation models match more reliably, and you rarely fight with column mapping.
Almost every US bank and SMB banking platform offers OFX:
- Major banks: Chase, Bank of America, Wells Fargo, Citi, U.S. Bank, PNC, TD Bank, Capital One, Truist
- SMB-focused platforms: Mercury, Relay, Bluevine, Brex (export available; Brex calls it “QFX”, same format)
- Most credit unions via Quicken-compatible export
To find it:
- Log in to your bank’s online portal
- Look for “Download,” “Export,” or “Statements”
- Select Quicken (.OFX) or QuickBooks Web Connect (.QFX). Both are OFX under the hood, and Odoo handles them identically
Tier B - Use if OFX isn't offered: QIF
QIF (Quicken Interchange Format) predates OFX but is still well-structured. Older credit unions, smaller community banks, and a handful of legacy business banking platforms export QIF before they export OFX. It works fine in Odoo, slightly less metadata than OFX, but no parsing surprises.
If your bank’s download menu shows “QIF” or “Quicken (older versions),” that’s what you’re looking at.
Tier C - Last resort: CSV
CSV files lack structure, and errors can go unnoticed. Each US bank has a different column order in its exports, requiring manual mapping in Odoo. Date format confusion is a key issue: some use MM/DD/YYYY, while others use YYYY-MM-DD.
This can result in incorrect transactions without error messages, and you may only discover the problem later when the bank balance doesn’t match.
If your bank only offers CSV (some online-only platforms and older fintechs), three rules:
Rule 1: Save your column mapping template in Odoo after the first import, so you don’t have to reconfigure it every month.
Rule 2: Verify the date format in your first import, pull a random transaction, and confirm that its Odoo posting date matches the date on your bank statement.
Rule 3: Spot-check the first 5 transactions every month against the bank statement. CSV parsing drift is real and quiet.
Quick decision rule
Open your bank’s online portal, go to statement download, and check the available formats in this order:
- See OFX, QFX, or Quicken Web Connect? Use it.
- See QIF? Use it.
- PDF only, and you’re on Odoo 18 Enterprise? Try OCR import.
- Only CSV available? Use it, but configure the mapping carefully and spot-check monthly.
The hour you spend testing formats once pays back every month afterward.
The Reconciliation Workflow: Auto-Matching, Manual Operations, and the "To Check" Discipline
Odoo will automatically match 60–80% of imported transactions if your setup is clean. Your job is to handle the 20–40% that need attention, and do it in a way that leaves a defensible trail.
Automatic matching (let Odoo do the work)
When you import a statement, Odoo scans each transaction against open invoices, bills, and registered payments using four criteria:
- Partner name: Does the bank transaction’s payee match a customer or vendor record?
- Amount: Is there an open invoice or bill for this exact amount?
- Reference number: Does the bank memo include an invoice number?
- Payment memo: If you manually registered a payment, does it match the bank label?
When several criteria align, Odoo auto-validates the reconciliation. Those transactions don’t appear in your “to reconcile” list at all. The cleaner your invoice numbering and payment memos are, the higher this hit rate will be.
Manual reconciliation (when auto-match fails)
For transactions Odoo can’t match automatically, the workflow is:
1. Click on an unmatched transaction in the left panel.
2. In the right panel under “Match Existing Entries,” search by partner name, invoice number, or amount.
3. Click the matching entry to select it. The Resulting Entry panel up top should balance to zero.
4. For partial payments, for example, a customer paid $900 on a $1,000 invoice, toggle “Fully Paid” off and enter the actual amount received. Odoo leaves the invoice open for the remaining $100.
5. For small bank fees or rounding differences:
- Switch to the “Manual Operations” tab
- Select your bank charges expense account
- Enter the amount to write off the difference.
- Click Validate when the resulting entry balances.
Common scenarios you’ll handle manually:
- Customer payments without a clear reference: search by customer name, match to the open invoice.
- Vendor bills paid in batches: match to the batch payment record rather than 20 individual transactions.
- Bank fees and merchant processor deductions: write off to bank charges expense.
- Timing differences: the payment was registered before the bank cleared it. Match the bank line to the existing payment record, not a new entry.
Using the "To Check" queue as a control checkpoint
When you’re not sure whether a match is correct, Odoo lets you mark a transaction “To Check” instead of validating it. Most teams treat this as a workflow convenience. It’s actually a control.
Note: Use the “To Check” status to track matches that are still being reviewed before confirmation. This provides strong evidence of internal control during audits. Have your team mark uncertain transactions as “To Check” and review them weekly, not just at month-end.
Re-reconciling: how to fix a wrong match
You’ll occasionally validate a match that turns out to be wrong, a duplicate payment, the wrong invoice, or a vendor refund applied as a payment. Odoo handles this through two actions.
Reset to New moves a reconciled transaction back to the “to reconcile” list.
- Open the reconciled bank statement line
- Click the Action menu
- Select “Reset to New.”
The original journal entry is removed, and you can re-match correctly.
Revert is the heavier option; it reverses the journal entry posting and creates an offsetting entry, preserving both for the audit trail.
- Use Revert when the original reconciliation was technically valid, but the underlying transaction needs to be unwound (e.g., a customer payment that bounced).
- Reset to New is faster, but Revert leaves a cleaner trail.
For anything that has already crossed a period boundary or appeared on a financial statement, use Revert.
Using batch payments
When you pay 20 vendor bills in a single ACH batch, create the batch payment in Odoo first. When the corresponding bank withdrawal hits, match the single bank line to the entire batch instead of 20 separate transactions. This consolidates 20 reconciliation actions into a single action, keeping your suspense account clean.
What if you could automate even more than this? You can, through reconciliation models.
Automating with Reconciliation Models (and Regex Patterns That Actually Work)
Reconciliation models are how Odoo recognizes recurring transactions and automatically posts them. Set up properly, they take the highest-volume, lowest-value transactions off your team’s plate entirely. This is also where most of the Odoo bookkeeping automation leverages in any growing business live.
You have two model types:
- Automated models run in the background. They scan every imported transaction and match instantly when their conditions are met.
- Manual button models appear as clickable buttons in the reconciliation view. You decide when to apply them.
Creating your first reconciliation model
1. Navigate to Accounting → Configuration → Banks → Reconciliation Models, click New.
2. Name it “Monthly Bank Fees.”
3. Set matching conditions:
- Transaction Type: Label
- Pattern: bank fee (Odoo will match any transaction containing these words)
- Optionally narrow by amount range or partner name
4. Define what happens in a match:
- Account: your Bank Charges expense account
- Amount: 100% (write off the full transaction)
- Label: “Bank maintenance fee”
5. Toggle Auto-validate ON to reconcile without review. Leave it OFF if you want the model to suggest the match but require a human click, a useful middle ground while you’re testing.
6. Save, then import a statement with a bank fee.
7. Watch it reconcile itself.
End-to-end, you’ve replaced a recurring 30-second monthly action with zero clicks. Multiply this across every recurring fee, interest charge, internal transfer, and merchant processor deposit, and a $1M business can typically automate 40–60% of its monthly reconciliation volume.
Common Odoo Bank Reconciliation Errors and How to Fix Them
Most of the urgent reconciliation calls we get at Ledger Labs trace to one of six recurring errors.
Here’s how to recognize each and what to do about it.
1. "Operation not allowed" - statement line numbering gap
Odoo blocks a reconciliation due to a duplicated or missing statement line number. The cause is almost always a partially deleted or twice-imported statement.
Fix:
Step 1: Open the bank journal’s sequence settings
Step 2: Identify the gap or duplicate
Step 3: Either remove the duplicate import or correct the sequence manually.
Note: Don’t bypass with a workaround; sequence gaps surface in any audit report.
2. Foreign currency amount not converting
You import a USD statement for a EUR-based company (or vice versa), and Odoo either posts the original currency without converting or converts at the wrong rate.
Fix:
Step 1: Set the bank journal’s currency explicitly (not “default”)
Step 2: Confirm the exchange rate source under Accounting → Configuration → Settings → Multi-Currency
Step 3: Verify the rate for the statement date is loaded
Our multi-currency reconciliation guide covers the full setup.
3. "Bank account not trusted" warning on invoices
When registering a payment, Odoo flags the linked bank account as untrusted. This is a fraud-protection check added in recent versions, triggered when an account is added or changed.
Fix:
Step 1: Open the customer or vendor record
Step 2: Go to the bank accounts tab
Step 3: Either confirm the account as trusted (after verifying it’s correct) or remove it.
Note: Don’t ignore the warning; it exists for a reason.
4. Community Edition: reconciliation widget missing in v17 or v18
After upgrading to Odoo Community 17 or 18, the reconciliation interface disappears.
Fix:
- Install the OCA account_reconcile_oca module.
The native widget was removed from Community Edition; the OCA module reinstates it.
For other Community-edition patches, see how to fix Odoo accounting errors.
5. Bank sync disconnected
Your automated feed stops importing, usually after the bank refreshes credentials or an MFA challenge times out.
Fix:
Step 1: Go to Accounting → Configuration → Online Synchronization
Step 2: Find the connection
Step 3: Click Re-authorize
Step 4: Re-approve through your bank’s portal
Note: If it fails repeatedly, the underlying provider (Yodlee, Plaid, SaltEdge) needs to refresh its certificate. Open a support ticket with Odoo.
6. Opening balance mismatch (phantom balance recovery)
Your Odoo balance has been off from the bank by a fixed amount for months, with no single transaction to explain it. The drift equals the gap between the opening balance you entered and the bank’s actual starting balance on cutover.
Fix:
Step 1: Pull the bank statement covering the cutover date
Step 2: Identify the exact starting balance
Step 3: Post a one-line adjustment
Step 4: Code the offset to retained earnings or a prior-period adjustment account, not the current P&L.
Note: If the drift has been compounding for more than a quarter, have a CPA review before posting; period-attribution errors can create their own issues.
A Practical Reconciliation Cadence (Daily → Quarterly)
Successful Odoo bank reconciliation isn’t about heroic month-end efforts. It’s about consistent daily habits, weekly cleanup, and quarterly maintenance.
Daily (5–10 minutes)
- Import new bank transactions (or verify the automated sync ran).
- Validate the obvious auto-matched items.
- Match anything else that’s clearly tied to an open invoice or bill.
Weekly (30 minutes)
- Clear the “To Check” queue from the past 7 days.
- Review unmatched transactions older than 7 days, usually a sign of a missing invoice or vendor record.
- Update reconciliation models if you notice a new recurring pattern.
Monthly (1–2 hours)
- Verify all bank statements are fully reconciled.
- Compare your Odoo bank balance to your actual statement closing balance; they should match to the penny.
- Generate reconciliation reports for management.
- Document any unusual transactions and their treatment.
Quarterly (2–3 hours)
- Audit your reconciliation models; are they still matching correctly, or have patterns drifted?
- Review the auto-match hit rate; if it’s dropped, investigate why.
- Update matching rules for new vendors, new fee structures, or new payment types.
- Train any new team members on the cadence.
This cadence prevents the chaos that makes reconciliation feel overwhelming. If you’re running monthly account reconciliations across multiple accounts (operating, savings, credit cards, merchant processors), this rhythm scales – it just gets repeated per account.
Conclusion
Successful Odoo bank reconciliation comes from establishing consistent daily habits instead of making last-minute efforts at month-end. Reconcile daily, review your models every three months, train your team well, and treat the “To Check” queue as a control tool rather than just a convenience. These simple practices help prevent the overwhelm that often accompanies reconciliation.
If you have followed this guide and your team still spends more time on reconciliation than it’s worth, or if you’ve recognized your business in the four CPA signals mentioned, consider looking into Odoo accounting services that include reconciliation as part of a broader managed-accounting engagement. As a CPA and IRS Enrolled Agent, I’ve assisted over 500 businesses in ecommerce, SaaS, manufacturing, and real estate move from stressful reconciliation cleanup to smooth, worry-free reconciliation.
Book a free consultation, and we’ll walk through what a clean Odoo reconciliation workflow looks like for your business.
FAQs
1. Can I do bank reconciliation in Odoo Community Edition?
Yes, but only with the OCA account_reconcile_oca module installed. Odoo Community 17 and 18 removed the native reconciliation widget; without the OCA addon, you won’t see the reconciliation interface at all. Odoo Enterprise users get full reconciliation features natively without any additional modules.
2. How do I fix a wrong reconciliation in Odoo?
Use “Reset to New” for unwinds within the current period, open the reconciled bank statement line, click the Action menu, and select “Reset to New.” For reconciliations that cross a period boundary or appear on a financial statement, use “Revert” instead, which reverses the journal entry and creates an offsetting entry, preserving both for the audit trail.
3. Which file format should I use to import bank statements?
Use OFX or CAMT.053 If your bank offers them, both are structured banking formats designed for import into accounting software. Fall back to QIF if neither is available. Use CSV only as a last resort, because column mapping and date format ambiguity can cause silent errors. PDF OCR import is improving in Odoo 18 Enterprise, but it isn’t yet reliable for high-volume use.
4. Why doesn't my opening balance match my bank?
The most common cause: you entered an incorrect opening balance on your first bank statement import, and every reconciliation since has inherited the error. Pull your bank statement covering the Odoo cutover date, identify the exact starting balance, and post a one-line journal entry adjusting cash to the correct amount. Code the offset to retained earnings or a prior-period adjustment account — not the current period.
5. What's the difference between 2-step and 3-step reconciliation?
2-step matches bank transactions directly to invoices or bills with no intermediate payment record. 3-step adds a separate “payment registered” record using outstanding accounts to track payments in transit between when they’re recorded in your books and when they clear the bank. 3-step is the audit-grade method; 2-step is faster for low-volume businesses without audit obligations.