1. 75% of organizations integrate cloud-based software like Office 365 and ERP systems for streamlined processes.
2. NetSuite users can boost productivity by 40% with Office 365 integration.
3. A 25% improvement in data accuracy is achieved through automated workflows in integration.
4. Over 50% of users report easier collaboration and communication post-integration.
5. Office 365 integration reduces IT administration by 30% due to unified access and centralized data management.
Are you tired of manual efforts to keep your customer information aligned?
Ever found yourself wondering if there’s a way to seamlessly bring together the two powerful software, NetSuite and Office 365?
Well, you are not alone. Many organizations like yours are looking for how to do NetSuite Office 365 integration in order to increase their businesses’ productivity.
For your convenience, we have curated this guide that contains the 5 steps for Office 365 NetSuite integration to help you understand the process easily.
Let’s get started.
Why Opt for NetSuite Integration with Office 365?
Office 365 is a cloud-based productivity tool that can help in managing email, calendars, documents, etc.
On the contrary, NetSuite is a cloud-based ERP solution that helps in business management.
The various features of NetSuite can help manage finances and analyze sales data. As a result, you can optimize various business processes.
Simply put, some organizations prefer NetSuite to handle their ERP, CRM, and/or eCommerce needs but still rely on Office 365 for administrative purposes. However, they keep on juggling between the two platforms, making their operations slower.
Here, NetSuite implementation with Office 365 bridges the gap between productivity and operational needs. By combining these two software, your business can save time and effort to manage the necessary operations.
What are the Key Benefits of NetSuite Office 365 Integration?
Integrating Office 365 with NetSuite can benefit your business substantially by streamlining business operations and enhancing productivity. Listed below are some of its key advantages:
- Improved Efficiency: NetSuite Office 365 integration saves time and effort as you can perform your tasks without constantly switching between the two applications.
- Eliminate the Need for Manual Data Entry: Ensure real-time dates across both platforms by merging NetSuite and Office 365. Thus, promoting seamless data flow without errors.
- Enhanced Collaborations: Experience real-time data accessing and data sharing features with Office 365 NetSuite integration.
- Promote Seamless Experience for Customers: Engage with your customers more effectively by unifying customer data, sales processes, and communication by NetSuite integration with Office 365.
- Better Decision Making: Make better data-driven decisions by combining the robust analytics and reporting capabilities of NetSuite with the productivity tools of Office 365.
Common Challenges of NetSuite Office 365 Integration
Before proceeding to the steps for integrating NetSuite ERP with Office 365, it makes sense to acquaint yourself with some common challenges you might face during integration:
- Concurrency Governance: Limitations on several simultaneous connections per license. Multiple connections can lead to errors.
- Cost and Budgeting: The cost of NetSuite Office 365 integration can vary widely. An unexpected cost can arrive during the process.
- Limitations in SuiteScript API
- API Complexity: NetSuite’s API is robust but complex to understand.
- Data Transfer Rates: Large-scale data transfers can take longer than expected.
5 Steps for NetSuite Office 365 Integration
To be honest, you can easily overcome these challenges if you adhere to the following 5 steps for NetSuite integration with Office 365. Let’s understand them step by step.
Step 1: Assess Your Integration Needs and Goals
The first step to seamless NetSuite Office 365 integration is to assess your organization’s needs and goals before deciding on an effective integration strategy. This assessment will help you identify critical business processes and your integration objectives.
Furthermore, you can gain confidence that the integration will precisely align with your organizational requirements. Consequently, you can attain a more impactful and successful Office 365 NetSuite integration outcome.
Now, let’s understand how you can successfully assess your integration goals.
Identify the Key Business Processes You Want to Streamline
You know how some business operations take longer than anticipated and you are always on the lookout to simplify them? Many organizations like yours face the following problems and NetSuite Office 365 integration can streamline these processes:
- Manual data entry takes a considerable amount of time.
- Inconsistent data across multiple systems creates confusion.
- The discrepancies in data across various platforms lead to data accuracy.
- Struggle to get a 360-degree view of business operations.
- Time delay in decision-making because of waiting for manual data entry.
- Customer experience is suffering due to delayed information.
Determine the Data and Functionality Required for Integration
When you have identified the specific workflows that you want to target with Office 365 NetSuite integration, the next step involves a detailed analysis of the required data and functionalities.
By doing this, you can avoid needless complexities and ensure that NetSuite integration with Office 365 aligns with your business objectives.
Need help with NetSuite integrations?
Connect with our NetSuite support staff now!
Some examples of such data and functionalities include:
- Determining the specific customer data fields needed to be synchronized between Office 365 and NetSuite.
- Decide on whether you want to share functionalities like sales order creation, appointment scheduling, or status updates between the two platforms.
- Some established functions such as customer creation, order approval, etc. initiate the corresponding actions in the integrated systems. Therefore, making yourself aware of these workflow triggers is mandatory.
Set Clear Goals and Objectives for the Integration
Once you are aware of the business processes that you need to improve with NetSuite Office 365 integration, it’s time to set clear goals and objectives. Having well-defined goals will simplify and guide the complete integration process.
Your organization’s motive for NetSuite Office 365 integration can be to:
- Reduce order processing time
- Enhance customer experience
- Decrease overall cost
Step 2: Choose the Right Integration Method
After identifying your business’s integration goals, decide on NetSuite Office 365 integration method that will be the best fit for you. The steps involved in choosing the best integration method for your business are as follows:
Understand the Available Integration Options
Before choosing what best suits your business, it’s better to understand all the available options on the market for Office 365 NetSuite integration. They include:
- API Integration: You can use NetSuite APIs like SuiteTalk API to connect NetSuite and Microsoft 365 directly.
- Connectors: Various pre-built connectors are available online that can streamline NetSuite integration with Office 365. One such example of a well-established third-party connector is Celigo. Read more about NetSuite Celigo integration here.
- Middleware Integration: Another option to facilitate communication between NetSuite ERP and Office 365 is utilizing middleware integrations such as Dell Boomi, MuleSoft, etc.
Note
Each method focuses on relevant business processes they can streamline. Hence, you must prioritize identifying NetSuite Office 365 objectives so that you don’t invest money in something you don’t need.
Select the Method that Best Suits Your Requirements and Resources
As soon as you have determined the right Office 365 NetSuite integration method, choose the one that aligns best with your business requirements. You must consider factors like available resources, budget, technicalities, and timeline before finalizing.
Step 3: Preparing Your Systems for Integration
The next step to seamlessly integrate NetSuite and Office 365 is to prepare both systems adequately. The integration method you have chosen, whether it’s API or connector, will influence the required prerequisites. Let’s discuss in depth how to make the systems ready for integration.
Ensure Your Netsuite and Office 365 Instances are Properly Set Up
There are some configurations you need to set in both systems before you begin with Office 365 NetSuite integration using the chosen integration method.
With regards to NetSuite ERP, you have to ensure that its API modules like CRM and SuiteTalk API are properly configured for a successful integration with Office 365. For your understanding, we have mentioned the steps below to configure NetSuite CRM and NetSuite SuiteTalk API.
Configuring NetSuite CRM
1. Login to your NetSuite account.
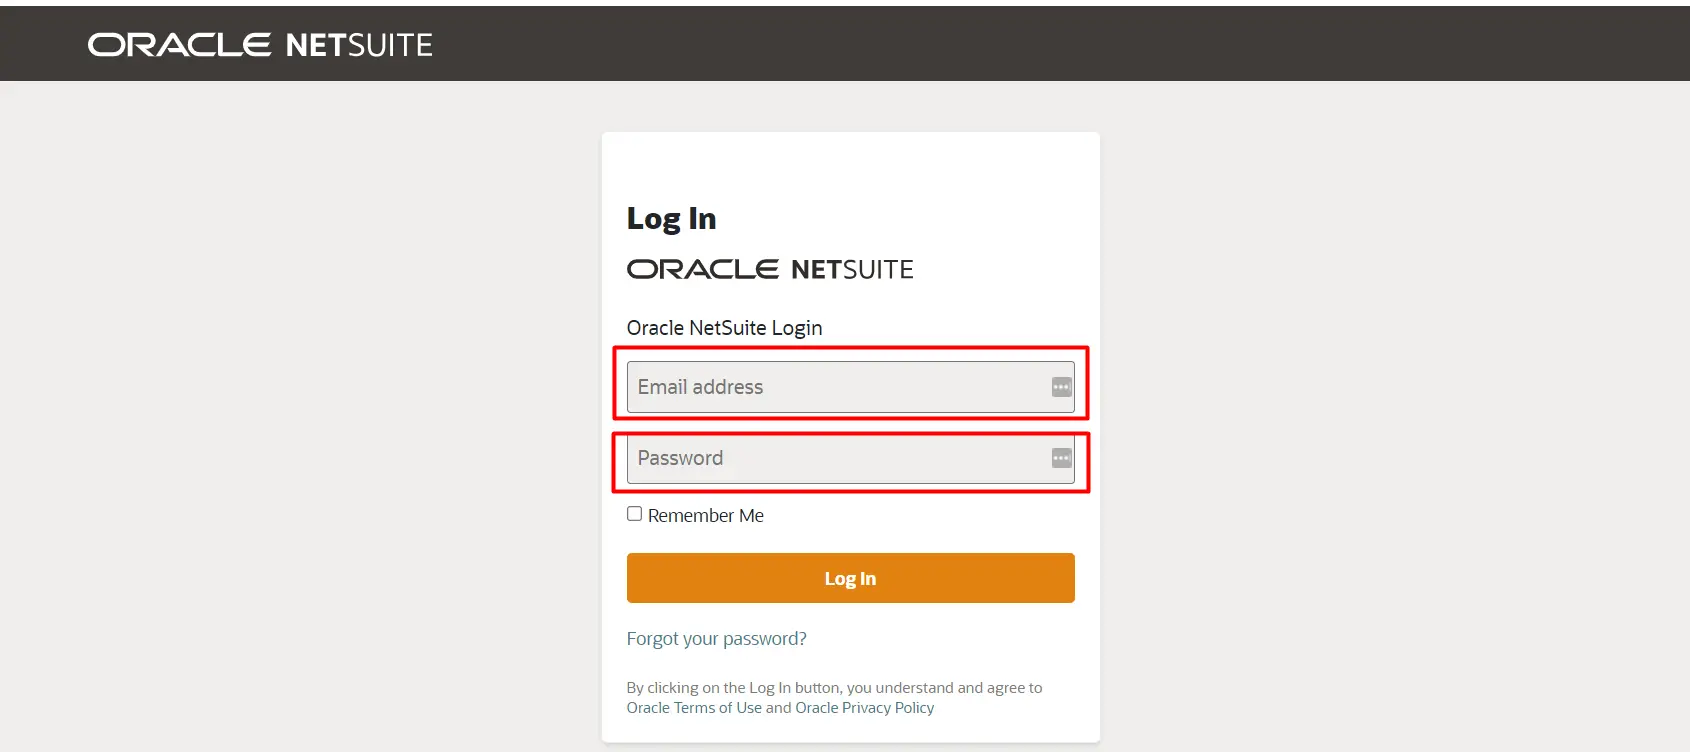
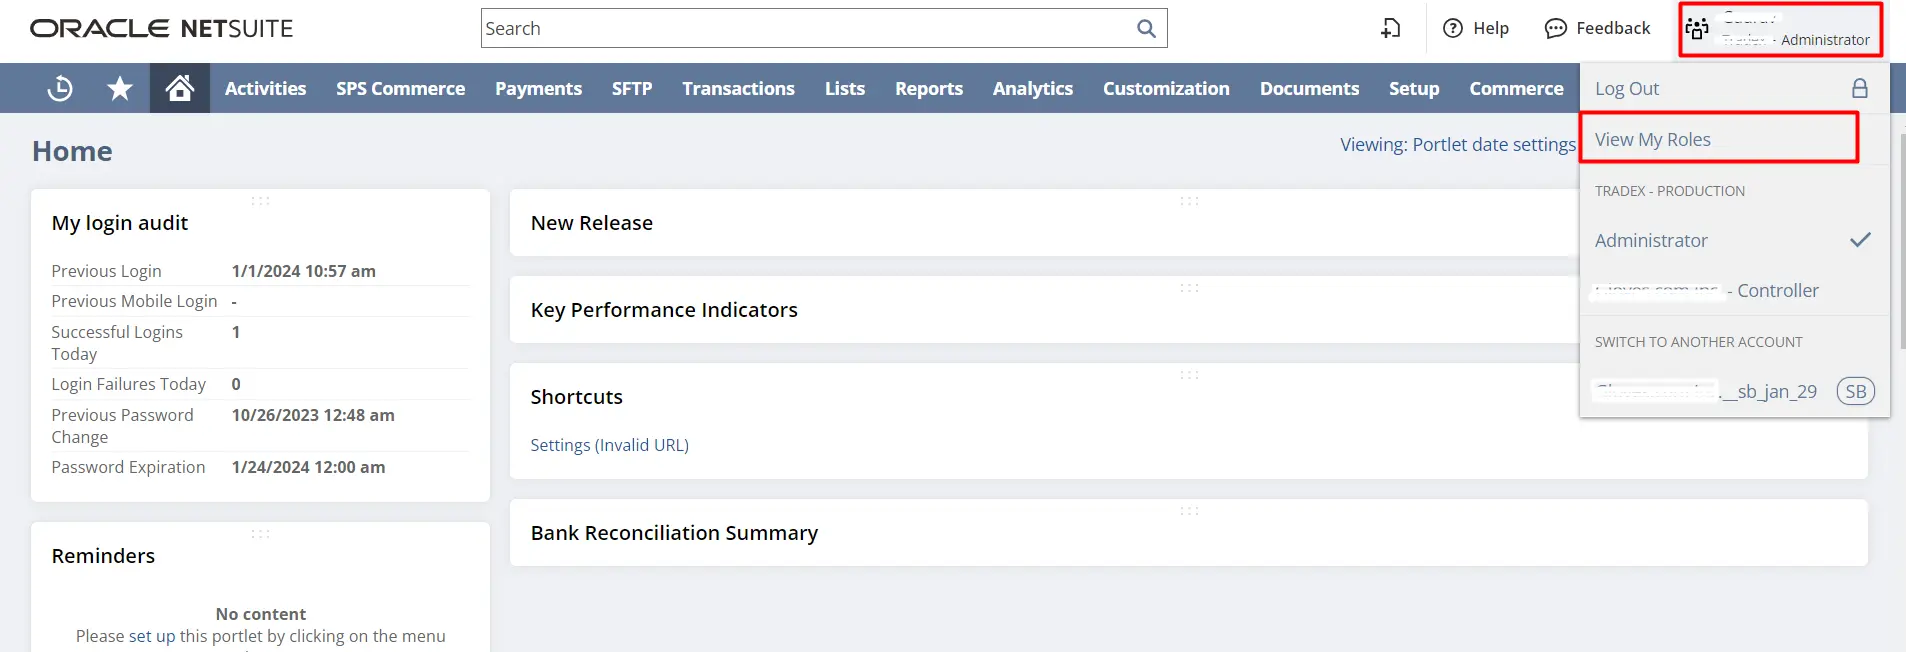
2. Click on the “Username” or “Administrator” tab available on the right-hand side corner of the dashboard. Select “View My Roles” from the drop-down menu.
3. From the list of roles, select NetSuite CRM partner relationship management (PRM) – Sales option.

4. After selecting the role, you can see and review various tools such as leads, opportunities, customers, reports, etc.
5. Then, ensure that the leads and customer records are properly filled with relevant information.
6. Identify areas that require customization based on your organization’s sales workflows.
7. Integrate the required communication tools like email with NetSuite CRM.
8. If email is already integrated, verify whether communication history with customers such as email interactions, sales orders, etc. are appropriately tracked within NetSuite CRM.
Configuring NetSuite SuiteTalk API
Before configuring SuiteTalk API, we first need to integrate it into the NetSuite ERP. For this:
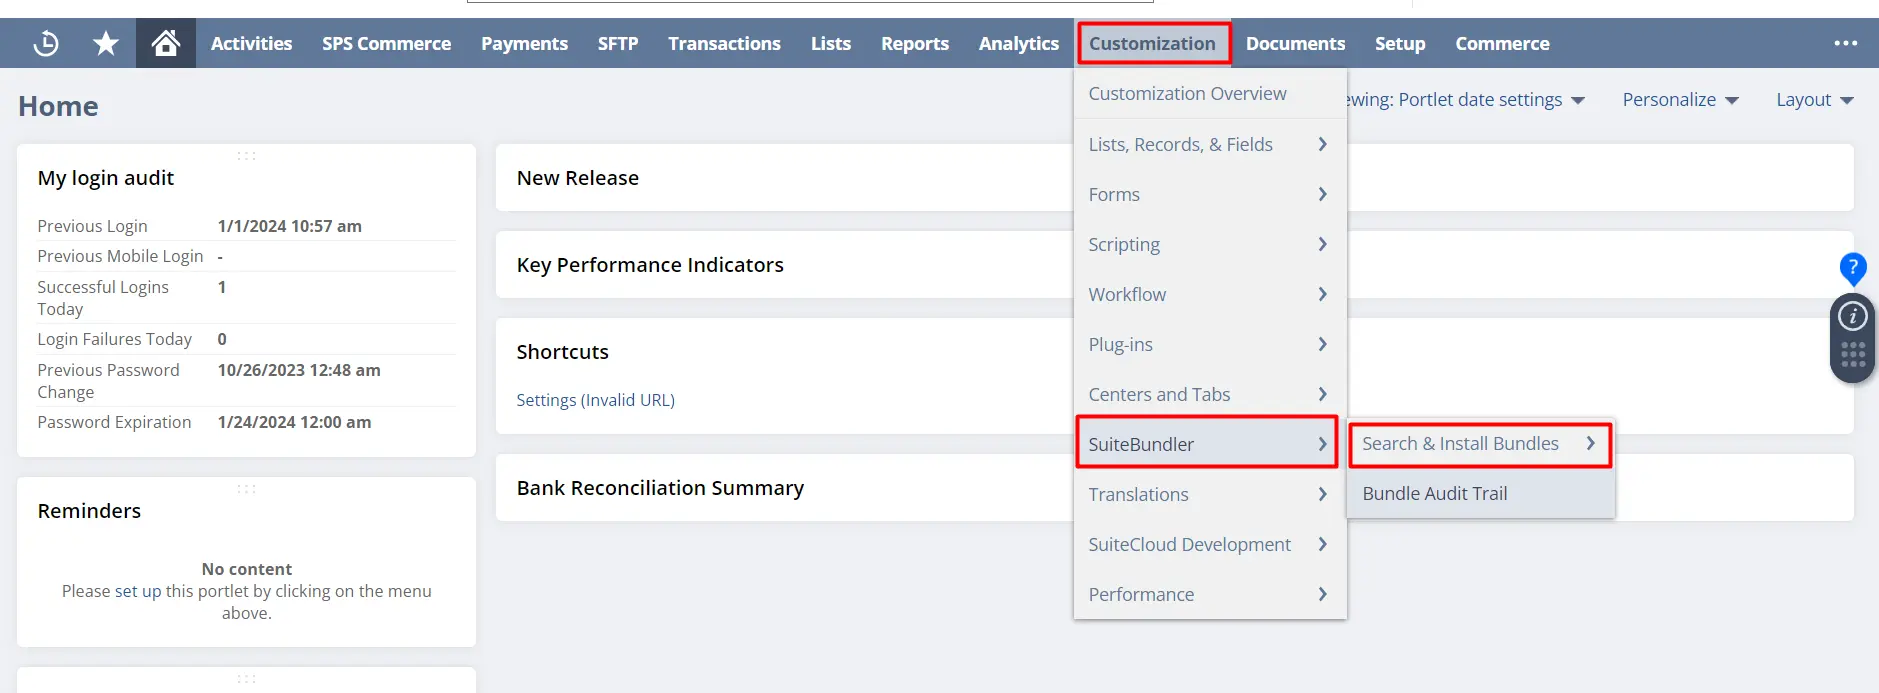
1. Navigate to the “Customization” tab in NetSuite dashboard.
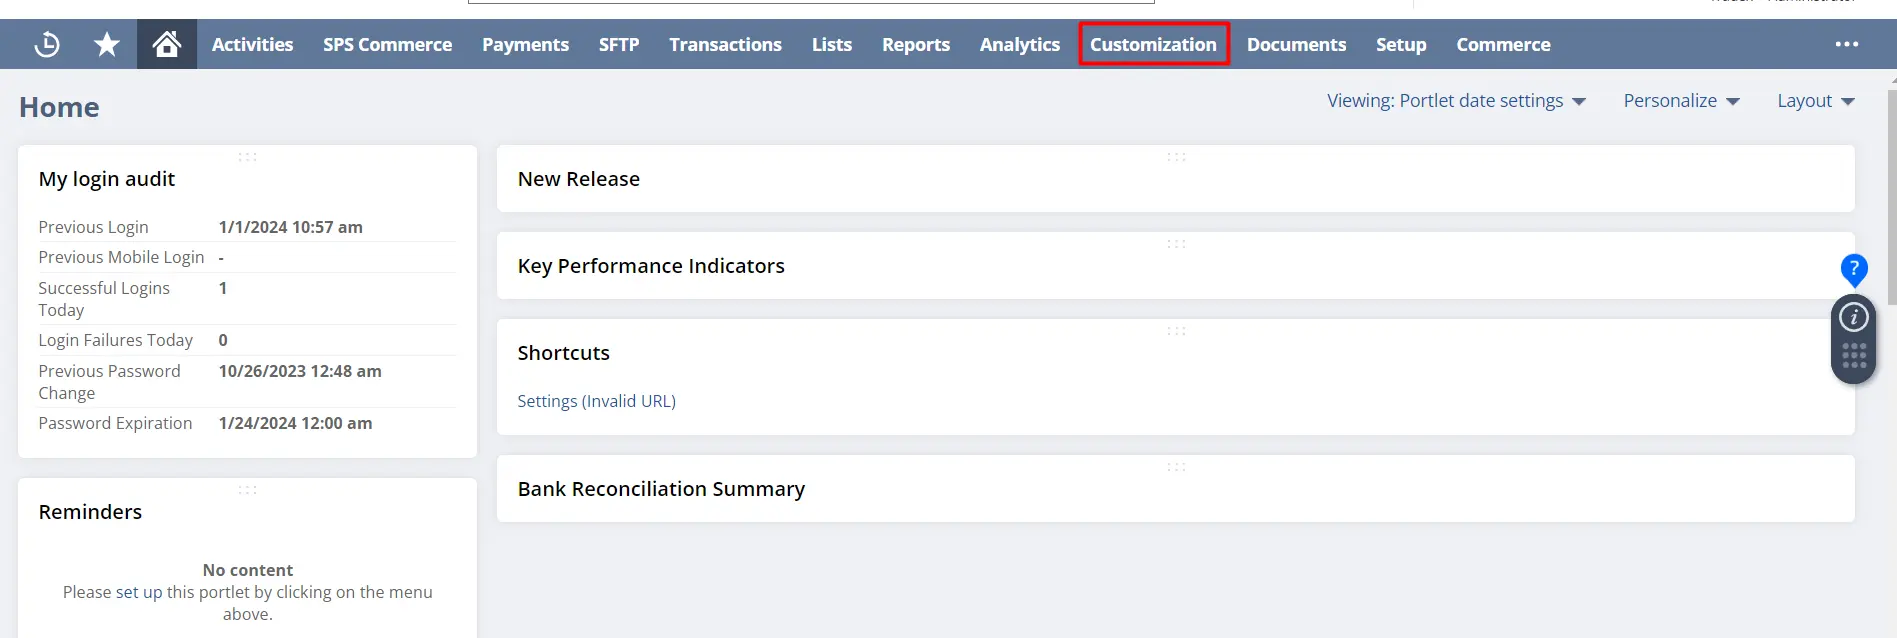
2. Select “SuiteBundler” from the drop-down menu and then click on “Search & Install Bundles” option.
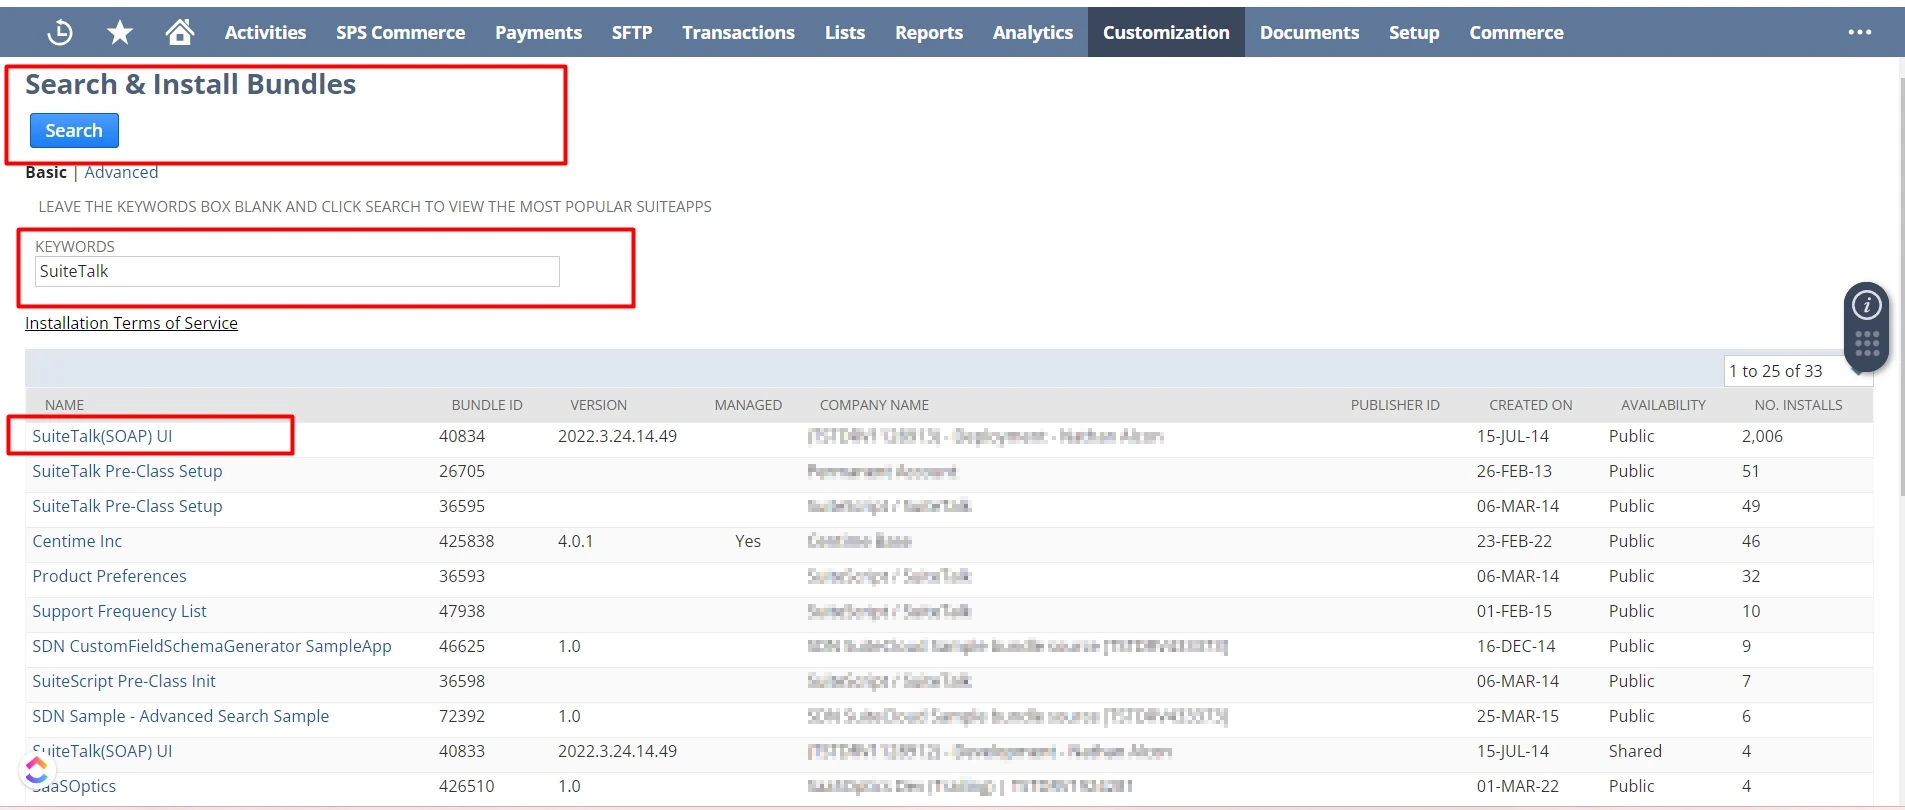
3. Find the required bundle from the list of available bundles in NetSuite. Depending upon your business requirements, you can choose between SuiteTalk REST or SuiteTalk SOAP operations.
4. Once it is installed, click on the “Setup” tab and choose SuiteTalk API from the drop-down menu.
5. Finish the setup process by providing the essential details such as your account number, consumer key, token ID, etc.
After completing the setup process, you can configure NetSuite SuiteTalk API as per the following instructions:
1. Navigate to Setup on NetSuite dashboard
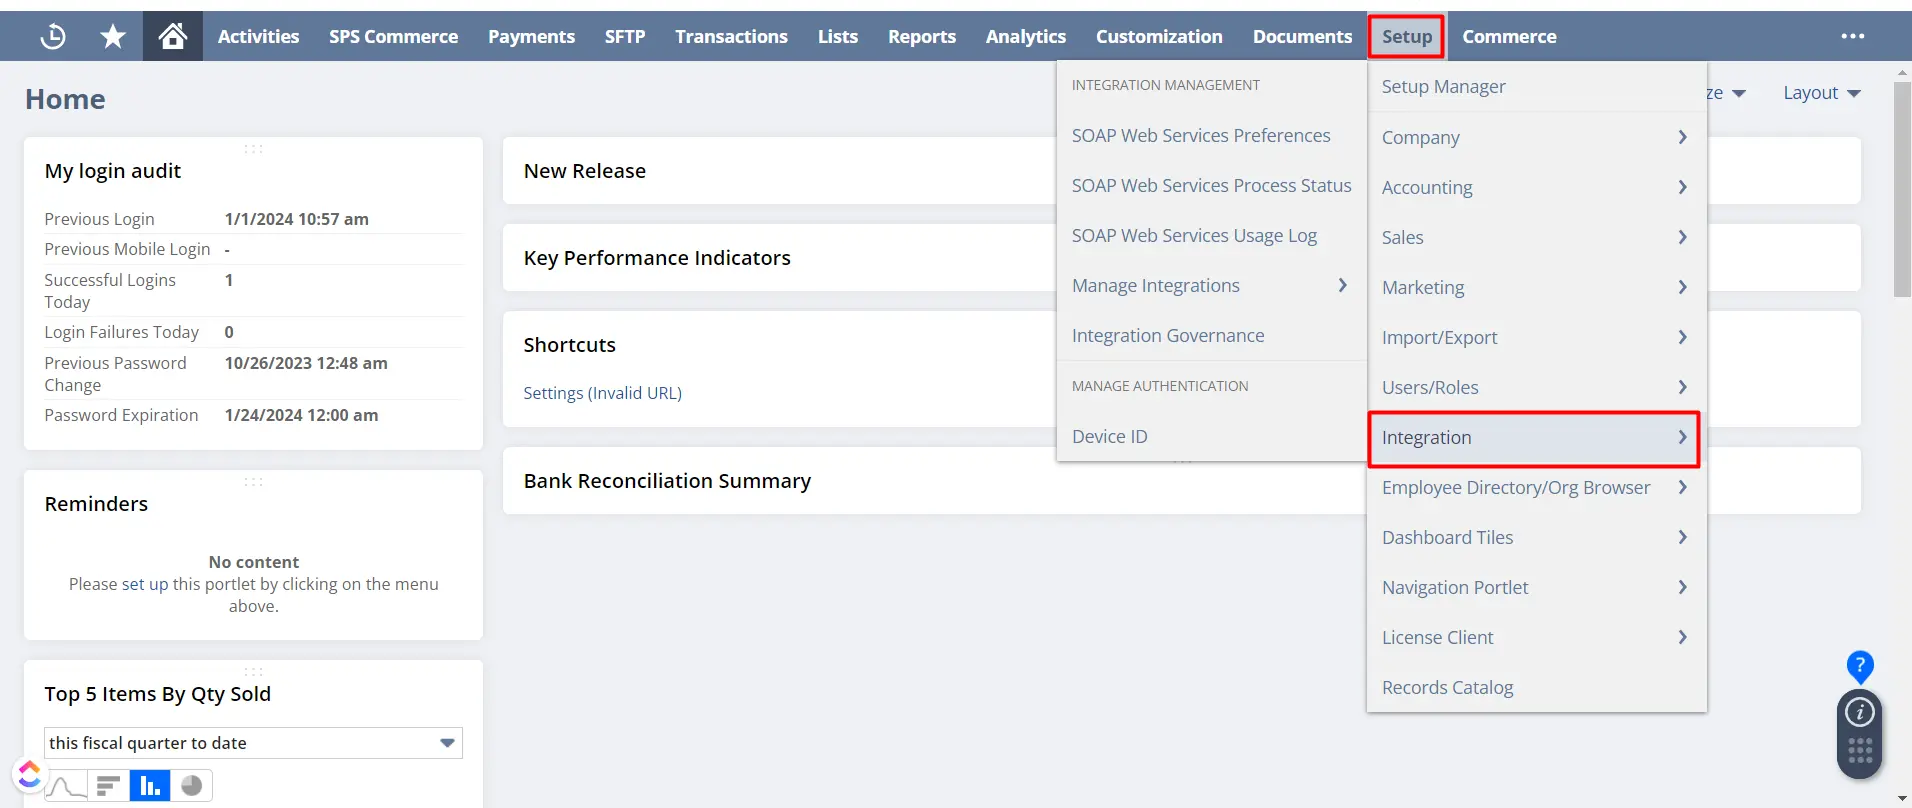
2. Click on “Integration” and select “SuiteTalk API”. Here, check whether the services are enabled or not.
3. Once checked, create a new integration record. For this, go to “Setup” menu, select “Integration” and then select “Integration Manager”.
4. Click on the “New” button.
5. Fill in the necessary details such as the integration name, authentication type, and roles that will be linked to it.
6. Configure authentication settings as per your integration needs. If you are using Token-Based authentication, then generate tokens. Simultaneously, set it up accordingly.
7. Specify preferences with SuiteTalk API in case you require any specific features for integration.
8. Grant necessary permission to perform actions through SuiteTalk API.
By following these steps, you will successfully ensure that your NetSuite and Office 365 integrations are properly set up.
Stuck with NetSuite Office 365 integration at any step?
Help us help you out!
Check for Any Prerequisites or System Requirements
As explained previously, you must precisely check your systems requirements before NetSuite Office 365 integration. Some other important prerequisites you need to take care of are:
- Check if NetSuite and Office 365 versions are compatible with the chosen integration method.
- Ensure Office 365 system requirements such as API access are provided.
- Also, verify that the browser used for NetSuite integration with Office 365 is compatible with both software.
Configure any Necessary Settings or Permissions
The steps we have mentioned before include all the information needed to seamlessly integrate NetSuite and Office 365. Let us just recap the key settings you need to take care of:
- Ensure that the integration user has the necessary rights of data access in NetSuite.
- Configure API permissions in Office 365 to provide the integration user access to required functionalities.
- Adjust firewall and security settings to secure the communication between the two systems.
- Implement encryption as a security measure to protect your data during NetSuite Office 365 integration.
Step 4: Configure The Integration
So far you have chosen the best Office 365 NetSuite integration method and prepared your systems for integration. To configure the integration using a connector, follow the step-by-step guide we mentioned below.
Acquire the Chosen Connector
Obtain the chosen connector based on your business’s needs. Pay the required fees as per the features the connector provides.
Configure the Credentials of the Connector
Get the necessary credentials from the connector provider including authentication tokens and API keys. Then, log in to the connector’s dashboard using the credentials.
Set Up the Necessary Connections or Connectors Between NetSuite and Office 365
Within the interface of the connector, look for the sections associated with NetSuite integration and Office 365 integration. Then, configure both systems using the account credentials to establish the connection.
Define the Data Mapping and Synchronization Rules
Identify the data points that you need to synchronize between Office 365 and NetSuite ERP. By doing so, you can use the connector’s interface to set up data mapping and synchronization rules. This will ensure seamless alignment between the two.
Test the Integration to Ensure Proper Functionality
After successful NetSuite Office 365 integration, use the connector’s testing features to test the integration. Verify data flow and if any issues arise while testing, address them using the connector’s troubleshooting and debugging features.
Step 5: Monitor and Maintain the Integration
Your NetSuite Office 365 integration process doesn’t end with installing and configuring a connector. You have to continuously monitor the integration to identify the issues that may arise and solve them ahead of time. Let’s look at the required steps in brief:
Regularly Monitor the Integration and Troubleshoot any Issues
The key to maintaining a smooth Office 365 NetSuite integration is to regularly check error messages, integration logs, and performance metrics. The users must be trained to ensure a proactive approach to troubleshooting. Besides, you can implement alerts for potential issues and seek support from the chosen integration partner.
Keep Track of any Changes or Updates to NetSuite or Office 365 that may Affect the Integration
NetSuite and Microsoft 365 keep on updating their systems. Therefore, you also need to stay informed about any changes or updates to these platforms as they can impact the NetSuite integration with Office 365.
On top of that, you also need to monitor the updates done to connectors or middleware platforms. This will help you to accommodate the changes in the integration as soon as they occur.
Make Necessary Adjustments or Improvements to Optimize The Integration Performance
The need for optimization becomes crucial as the business evolves. Hence, you should make necessary adjustments and identify bottlenecks to enhance the efficiency of NetSuite Office 365 integration.
For each integration method, different optimization strategies can be applied. For example:
- Batch API calls for more efficient data transfer.
- Adjust data transformation logic for faster processing through the Middleware integration method.
- Attain faster synchronization by fine-tuning the connector settings.
Have you hit these complications with your NetSuite integrations? Read this to get a way out!
Key Things to Keep In Mind While Integrating NetSuite and Office 365
So far we have explained the 5 steps needed for NetSuite Office 365 integration, however, if you keep the following key points in mind, it can make your integration process smoother.
Choosing the Right Office 365 NetSuite Integration Partner
An integration partner can make or break your NetSuite and Office 365 Integration project. Here are some key factors to consider before choosing the right partner:
- Alignment with your business goals: Should understand your business objectives and overall strategy. Make sure they can articulate how their solutions will help you achieve your business goals.
- Technical Expertise: Look for a partner with a strong track record of NetSuite Integrations. They should be well-versed in NetSuite API, suite scripts, and other integrating methods.
- Customer Reviews & Testimonials: Check out reviews and testimonials from other customers. This will give you a good idea of the partner’s reliability and quality of service.
- Pricing: Choose a partner that fits right into your budget. Beware of hidden fees and always ask for a detailed quote.
- Support & Maintenance: Post-integration support is crucial. Ensure that the partner offers robust customer service and maintenance to handle any support that may arise.
- Cultural Fit: The integration process can be long and complex. So, having a partner that aligns with your company culture will make the journey smoother.
Evaluating the Pros and Cons of Each Office 365 NetSuite Integration Method
When it comes to NetSuite Office 365 integration, you have several routes to consider, each has its own set of advantages and limitations. Let’s evaluate the pros and cons of the different integration methods:
API Integration
- a) Pros: Real-time data transfer, options for customization
- b) Cons: Efforts in development, the potential for complexity
Connectors
- a) Pros: Quick to implement, less technical expertise required
- b) Cons: Limited customization, may not support all the features, dependency on connector updates
Middleware Integration Platforms
- a) Pros: Scalable, supports multiple integrations, streamlined workflows, often comes with pre-built templates.
- b) Cons: Subscription fees, may require technical expertise.
To summarize
NetSuite Office 365 integration can act as a powerful tool that can make your business processes easier. However, you have to involve yourself in every step of Office 365 NetSuite integration, including accessing your business needs to monitor the integration.
Only then can you achieve a seamless connection between the two systems and make your complex business operations easier.
Given the complexities and challenges involved in NetSuite integration with Office 365, it may be beneficial to consult with an expert.
Connect with our experienced NetSuite consultants who can provide you with tailored solutions, helping you navigate these challenges more effectively.


