
Odoo automates your entire invoice workflow, and if you want to automate invoices in Odoo the right way, this guide covers everything from the first setting toggle to the first automated payment reminder.
From generating customer invoices to scanning vendor bills, routing approvals, and sending payment reminders, Odoo handles it without manual data entry at any step.
Yet most Odoo businesses still process invoices manually.
Not because the automation doesn’t exist. Because nobody told them it was already built in.
Here’s what that costs: a finance team spending 10 hours per week on manual invoicing burns $1,500/month in labor, at a fully loaded rate of $35/hour. That’s $18,000 a year on work Odoo can handle automatically.
At Ledger Labs, our CPA team has configured Odoo invoice automation for 30+ businesses across ecommerce, SaaS, and manufacturing. The setup that saves 10+ hours a month is already inside your Odoo instance.
Key Takeaways
- Odoo invoice automation connects sales orders, payments, vendor bills, and bank feeds into a single continuous flow.
- Invoices are generated, sent, matched, and reconciled with minimal human input.
- AI-powered OCR removes the need for manual vendor bill entry. Initially, accuracy for new vendor invoices is 70% to 80%. After correcting 10 to 15 invoices from the same supplier, accuracy improves to 93% to 97% for standard PDF layouts.
- Workflow automation offers the best return on investment (ROI) by streamlining tasks such as approval routing and exception handling. It reduces unnecessary email exchanges that can delay accounts payable (AP) and accounts receivable (AR).
- Odoo’s pay-per-scan OCR keeps costs predictable. At $0.10 per invoice, 300 vendor bills monthly costs $30, less than one hour of your accounting team’s time.
- For teams processing 50+ invoices per month, a properly configured Odoo setup typically pays for itself within 60–90 days.
What is Odoo Invoice Automation?
Odoo invoice automation uses Odoo’s built-in AI and workflow tools to automatically create, send, process, and track invoices, without manual data entry at each step.
Instead of copying line items from a sales order into an invoice form, Odoo does it for you. Instead of opening vendor PDFs and typing in amounts, OCR reads and extracts the data. Instead of manually following up on late invoices, Odoo sends escalating reminders on a schedule you define once.
The system handles six core tasks automatically:
- Generates invoices from sales orders the moment payment is confirmed or delivery is validated
- Scans vendor bills using OCR and auto-fills invoice fields from unstructured PDFs
- Matches invoices to purchase orders and receipts through three-way matching
- Routes invoices through approval workflows based on your business rules
- Sends payment reminders automatically when invoices become overdue
- Reconciles incoming payments with bank transactions using AI pattern recognition
One important distinction upfront: Community Edition handles basic automatic invoice generation from sales orders at no licensing cost. Enterprise Edition adds recurring invoice scheduling, advanced approval workflows, native payment processor integrations, and OCR-powered vendor bill scanning.
Who gets the most value from this:
- Ecommerce businesses with high transaction volumes
- Manufacturing companies managing large vendor bill counts
- SaaS companies with recurring billing
- Accounting teams that spend more time on data entry than on financial analysis
For a full breakdown of Odoo’s invoicing methods, manual, timesheet-based, milestone, subscription, and eCommerce billing, see our complete guide to Odoo invoicing methods.
Types of Invoice Automation in Odoo
Odoo offers four distinct types of invoice automation: sales invoice automation, vendor bill automation, invoice workflow automation, and delivery-based invoicing.
Each one solves a different problem. Start with the type that addresses your biggest time drain; don’t try to implement all four simultaneously.
1. Sales Invoice Automation (Customer Invoicing)
Sales invoice automation generates customer invoices automatically based on sales order events, payment confirmation, delivery validation, or contract billing cycles.
This is where most businesses start, and for good reason. The ROI is immediate and measurable.
When a customer completes checkout on your ecommerce site, Odoo creates and emails the invoice instantly; no one touches it. For project-based businesses, payment-triggered invoicing automatically generates an invoice once the customer signs and pays the deposit.
Community Edition handles basic automatic invoice generation from confirmed sales orders. Enterprise Edition adds recurring invoice scheduling, advanced workflow rules, and native Stripe and PayPal integration.
2. Vendor Bill Automation (Accounts Payable)
Vendor bill automation uses AI-powered OCR to scan incoming supplier invoices, extract key data, and create draft bills in Odoo, eliminating manual AP data entry.
This is where teams recover the most time. Supplier invoices arrive in dozens of formats, including PDFs, scanned images, and phone photos. OCR handles all of them.
The process works like this: your AP team forwards vendor bills to a dedicated Odoo email address. Odoo scans each document, extracts the vendor name, invoice number, date, line items, amounts, and tax details, then creates a draft bill ready for review.
Three-way matching then automatically compares your purchase order, goods receipt, and vendor invoice. Discrepancies route to a review queue; your team only touches the exceptions.
Pricing note: OCR costs $0.10 per scan using Odoo’s IAP credits. For 300 vendor bills monthly, that’s $30.
3. Invoice Workflow Automation
Invoice workflow automation routes invoices through approval, exception handling, and payment follow-up sequences based on rules you configure once.
This layer sits on top of invoice creation. It handles what happens after the invoice exists.
Approval routing sends bills to the right reviewer based on amount thresholds or department rules. Payment reminder automation detects overdue invoices and escalates email sequences without intervention.
Exception handling flags invoices that fall outside defined parameters; your team reviews only those that genuinely require human judgment.
4. Delivery-Based Invoicing
Delivery-based invoicing automatically triggers invoice creation when Odoo validates a delivery order, not when the sale is confirmed.
This matters for product businesses with partial shipments or split deliveries. Each validated delivery generates its own invoice for the items actually shipped. Odoo automatically allocates any deposit or down payment against invoices in sequence.
You can configure this globally or override it per customer, useful when specific clients bill differently from your standard policy.
How Odoo's AI-Powered OCR Reads Vendor Bills?
Odoo’s OCR reads vendor bills in four steps: document upload, text extraction, AI field mapping, and human validation.
The system learns each vendor’s layout over time, improving accuracy with every invoice processed.
Here’s the question we hear most before implementation: “Can the software actually read our invoices accurately enough to trust?”
Short answer: yes, but accuracy depends on the vendor, PDF quality, and how much time you invest in the learning phase.
Here’s exactly how it works:
Step 1: Document Upload or Email Reception
You upload a PDF or image directly in Odoo, forward it to your dedicated email address, or scan using Odoo’s mobile app. The system accepts PDFs, JPGs, and PNGs.
For high-volume AP teams, the email intake method is the most efficient. Your team can forward bills from their inboxes, no Odoo login required.
Step 2: OCR Text Extraction
Odoo’s OCR engine converts the image into machine-readable text. It first scans for embedded metadata, Swiss QR codes, and French Factur-X formats, which provide structured data and significantly improve accuracy.
Standard PDFs without embedded metadata undergo character recognition during document layout.
Step 3: AI Field Mapping with Vendor Templates
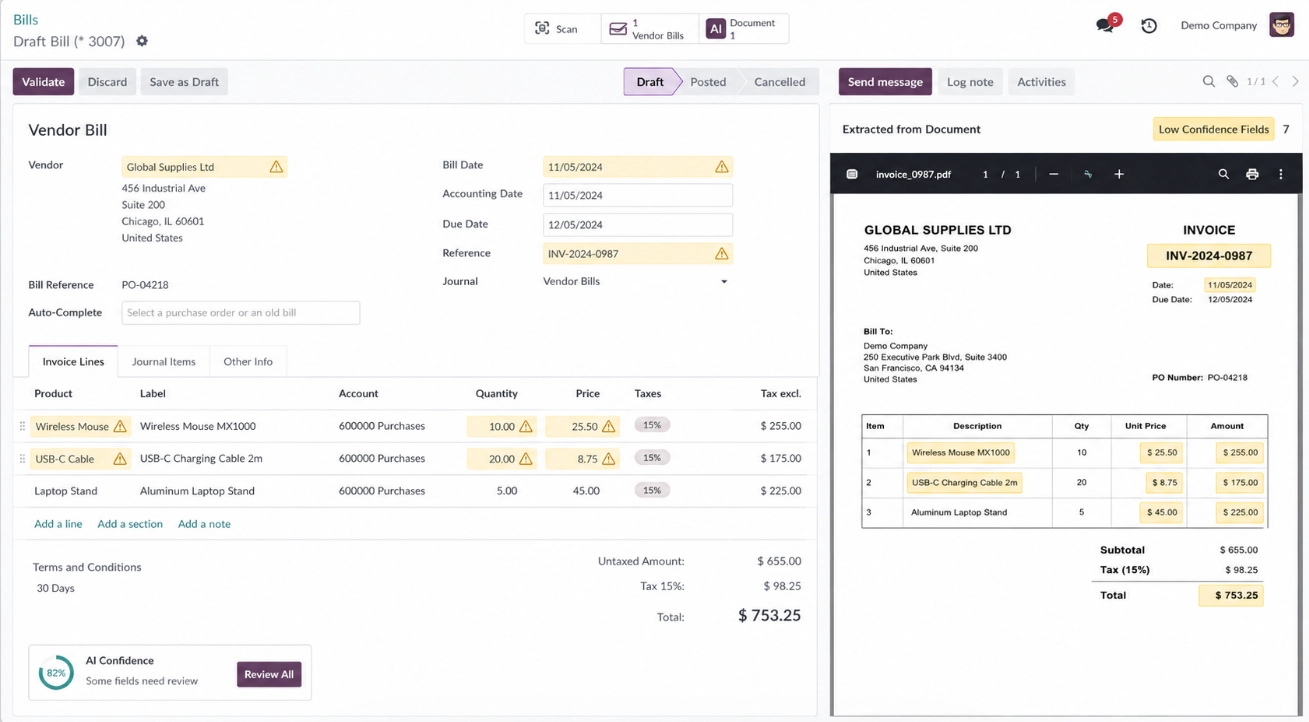
The AI identifies which extracted text corresponds to which invoice field: vendor name, invoice number, date, line items, quantities, prices, taxes, and totals.
After you process a few invoices from the same vendor and correct any errors, Odoo builds a custom template for that vendor’s layout.
From our experience across 30+ client implementations:
- First-time vendor accuracy: 70–80%
- After 10–15 corrected invoices from the same vendor: 93–97% for standard PDFs
- Handwritten invoices or low-resolution scans: consistently underperform, plan for a longer training period if these make up a significant portion of your volume
Step 4: Human Validation Review
Odoo presents the extracted data in draft form. Fields with low confidence scores are highlighted for review. You correct any errors, click validate, and the system applies those corrections to future invoices from that vendor.
How to Set Up Automatic Invoicing from Sales Orders?
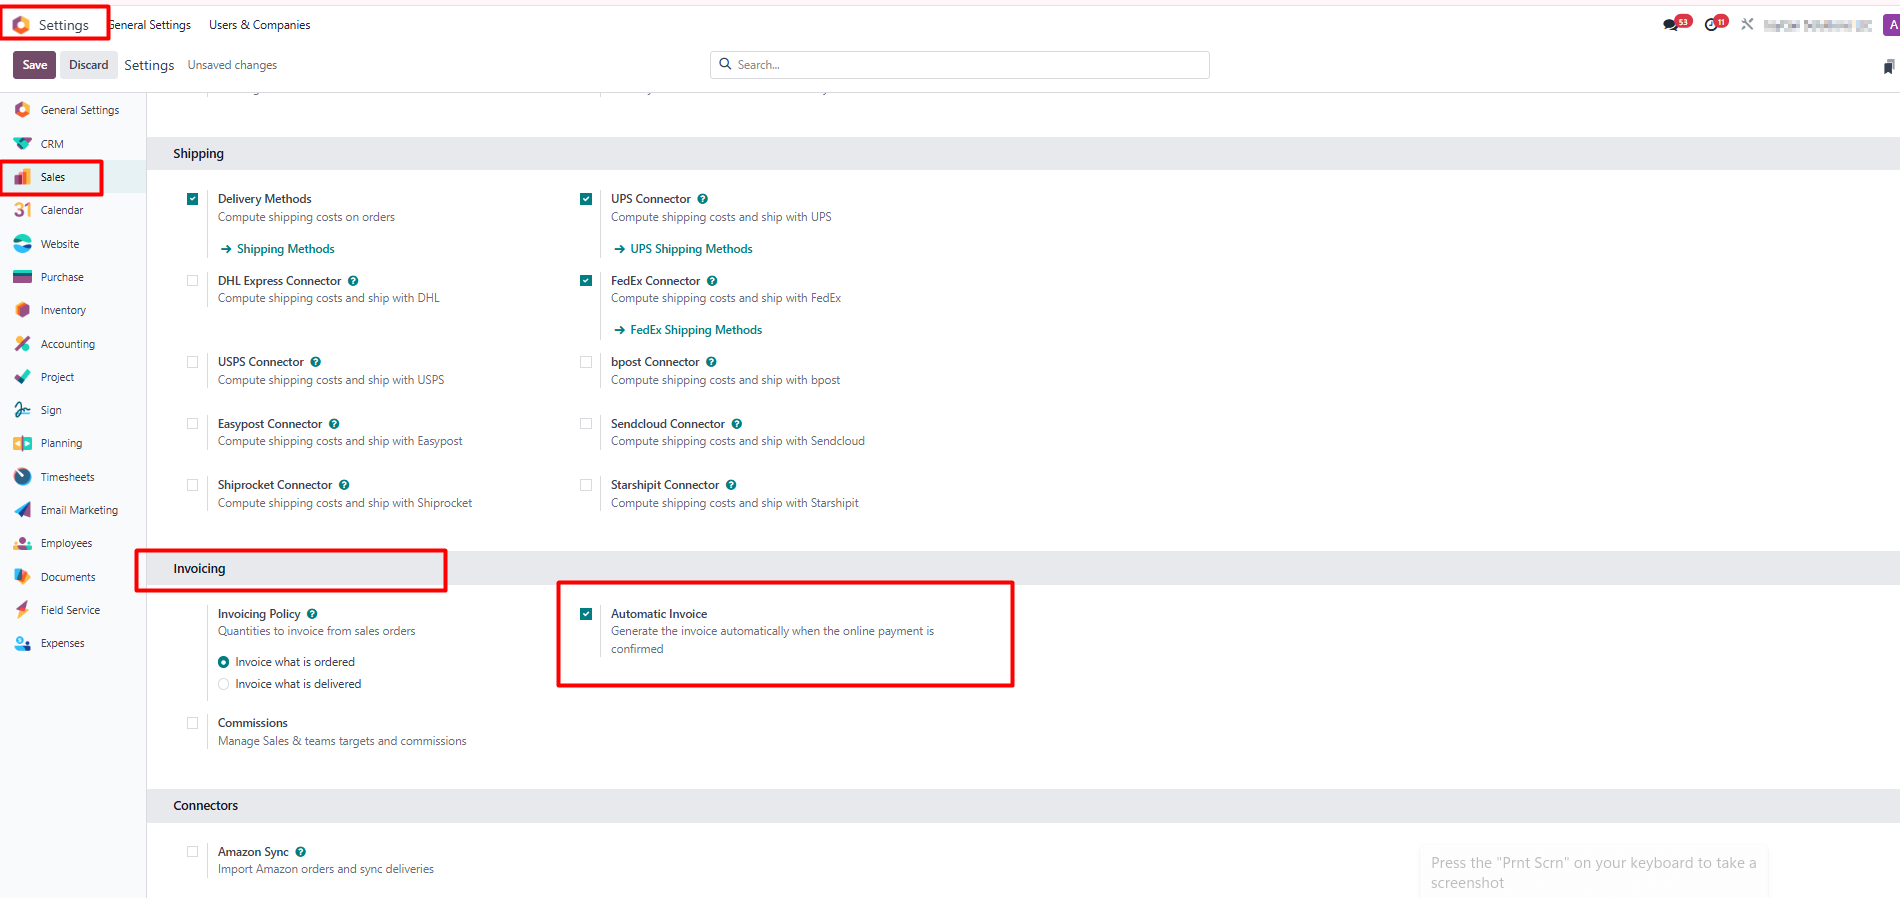
To set up automatic invoicing in Odoo, enable the “Automatic Invoice” toggle in Settings → Sales → Invoicing, configure your invoicing policy, connect a payment provider, and set up your email template. The process takes 3–5 hours, including testing.
Here’s the complete 8-step configuration for Odoo 16, 17, and 18.
Step 1: Enable Automatic Invoice
- Go to Settings → Sales → Invoicing
- Turn on “Automatic Invoice.”
This is the master switch. Without it, no other configuration in this section will fire.
Step 2: Set Your Invoicing Policy
Under the same settings panel,
Choose your invoicing policy:
- “Invoice what is ordered” – creates the invoice based on sales order quantities, immediately upon payment confirmation. Use this for digital products and services.
- “Invoice what is delivered” – waits for delivery validation before creating the invoice. Use this for physical goods.
Note: Using the wrong policy is the most common first-setup mistake we see. Billing before shipping creates reconciliation problems that your team will spend hours untangling.
Step 3: Connect a Payment Provider
- Go to Settings → Payment Providers.
- Add and configure at least one gateway: Stripe, PayPal, Authorize.net, or your preferred processor.
- Each provider needs your API credentials to connect. Odoo uses OAuth, so your credentials are never stored in plain text.
Step 4: Enable Online Signature (If Required)
- Go to Settings → Sales → Quotations & Orders
- Enable “Online Signature.”
Customers must sign digitally before the Pay button appears. This creates an audit trail that your team will appreciate when payment disputes come up months later.
Step 5: Configure Your Invoice Template
- Go to Settings → General Settings → Business Documents
- Customize your invoice template.
- Choose from four preset layouts or build a custom design.
- Set your logo, company details, payment terms, and any required legal language before you go live.
Step 6: Set Up Email Automation
To edit your invoice email template in Odoo 16:
- Navigate to Settings → Technical → Email Templates (developer mode is required). In Odoo 17 and 18, this process is simplified.
- Configure automatic sending rules
- Customize the message body and include a direct payment link so customers can make payments without logging in to the portal.
Step 7: Run a Test Order
- Create a test quotation
- Send it to yourself and sign it
- Complete a test payment
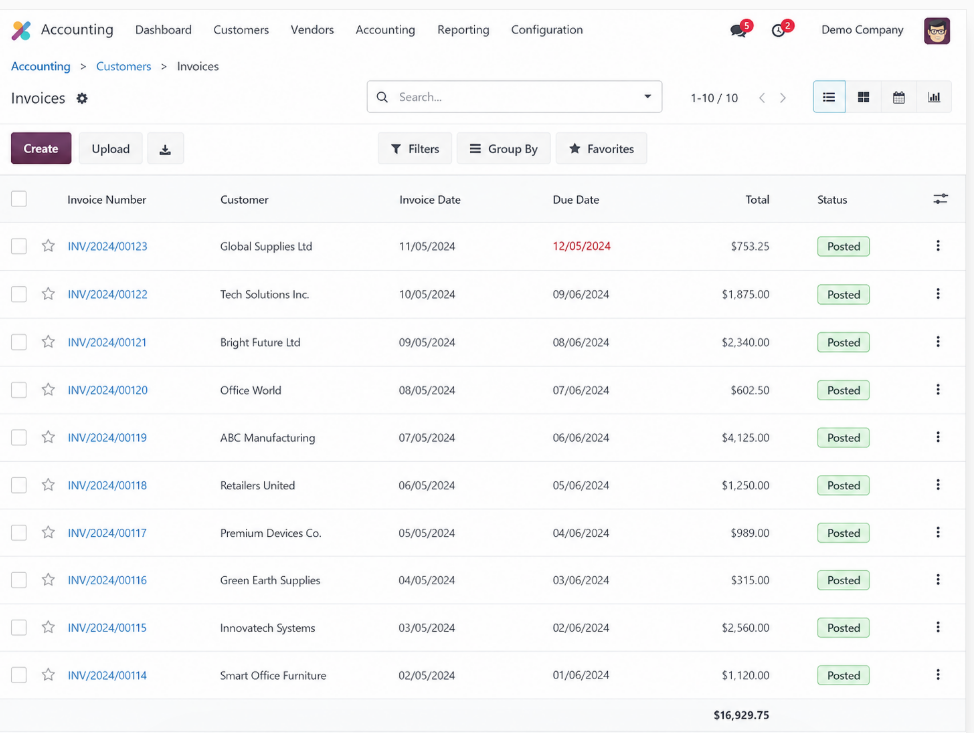
- Verify that the invoice is generated automatically and appears in Accounting → Customers → Invoices with the Posted status.
Note: Do not skip this step; edge cases in your invoicing policy surface here, not in production with real customers.
Step 8: Monitor Your First 10 Live Invoices
- Check that amounts, tax calculations, line items, and customer details populate correctly on each one.
- Adjust your template or settings before expanding to your full customer base.
How to Set Up Recurring Invoices in Odoo
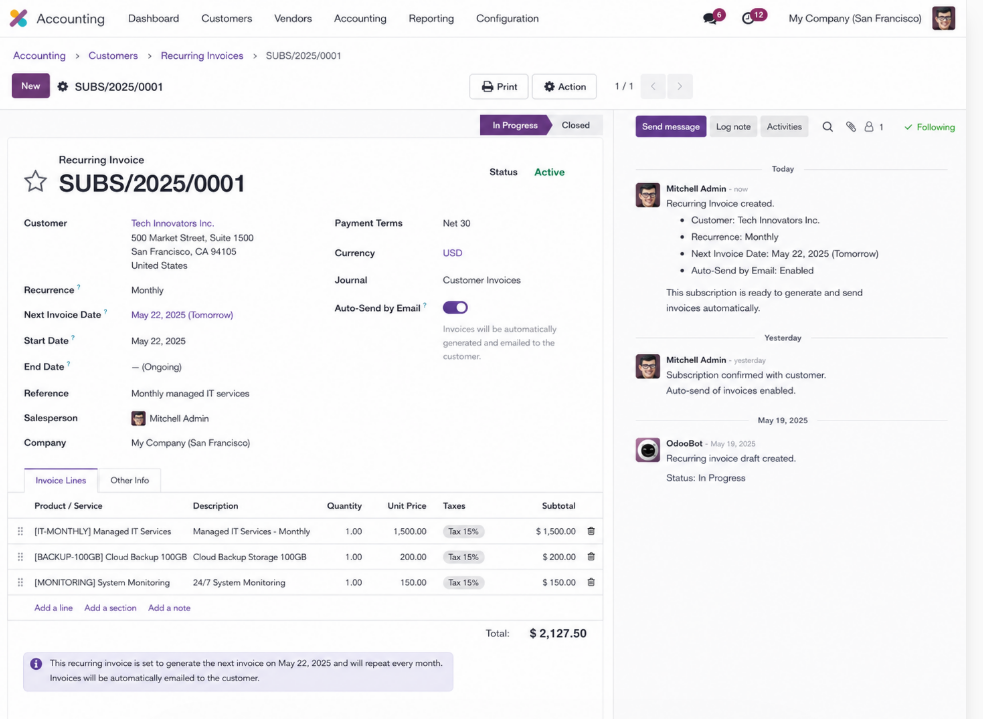
To set up recurring invoices in Odoo, install the Subscriptions module, navigate to Accounting → Customers → Recurring Invoices, configure the customer, billing frequency, and products, then enable auto-send. This feature requires Enterprise Edition.
Community Edition does not include a native recurring invoice scheduler.
For Enterprise users, here’s the full setup:
Step 1: Install the Subscriptions Module
Go to Apps → search “Subscriptions” → Install. The recurring invoice scheduler in Accounting depends on this module; it won’t appear without it.
Step 2: Create a New Recurring Invoice
Navigate to Accounting → Customers → Recurring Invoices (Odoo 16/17) or Accounting → Customers → Contracts (Odoo 18, where the subscriptions module was redesigned). Click New.
Step 3: Configure the Contract
Set the following fields:
- Customer: Select the billing contact
- Recurrence: Weekly, monthly, quarterly, or annual
- Invoice Date: Set the first invoice date, Odoo calculates subsequent dates automatically
- Products/Services: Add line items with quantities and pricing, these carry forward on every cycle
Payment Terms: Net 30, due on receipt, or any custom terms you’ve configured
Step 4: Enable Auto-Send
Toggle the email delivery option on and select your invoice template. When each cycle fires, Odoo creates the invoice in draft, posts it, and emails it to the customer, all without anyone opening the system.
Step 5: Set an End Date or Leave Open
Set an end date for fixed-term contracts. For ongoing billing, leave the end date blank. Odoo continues generating invoices until you manually stop or archive the contract.
Step 6: Test Before Going Live
Advance the next invoice date to tomorrow. Confirm that the invoice has been generated and sent correctly. Reset to the actual billing schedule before the contract goes active.
How to Automate Vendor Bill Processing in Odoo?
To automate vendor bill processing in Odoo, enable Bill Digitization in Accounting settings, set up your email intake alias, upload your first vendor bills to train OCR, configure three-way matching, and set approval thresholds. Full setup takes 2–4 hours.
Here’s the step-by-step:
Step 1: Enable Bill Digitization
- Go to Accounting → Configuration → Settings
- Enable “Bill Digitization” under Vendor Bills
- Connect your IAP account when prompted; this is where OCR credits are managed at $0.10 per scan.
Step 2: Set Up Email Intake
- Under Accounting → Configuration → Journals → Vendor Bills
- Add an email alias, for example, bills@yourcompany.odoo.com.
- Share this address with your AP team and key vendors.
Any PDF forwarded to this address automatically creates a draft vendor bill in Odoo.
Step 3: Train the System on Your Top Vendors
- Upload 3–5 bills manually from your highest-volume vendors.
- Go to Accounting → Vendors → Bills → New → Upload.
- Review each draft, correct extraction errors, and validate.
This is your training investment; the system is learning each vendor’s document layout so future bills can be processed accurately.
Step 4: Enable Three-Way Matching
- Go to Accounting → Configuration → Settings
- Enable “Purchase Order Matching”
Once active, Odoo automatically compares each vendor bill against its associated purchase order and goods receipt. Discrepancies above your configured tolerance threshold route to a review queue instead of posting automatically, a critical internal control for AP teams.
Step 5: Configure Approval Thresholds
- Go to Accounting → Configuration → Settings → Approvals
- Define your routing rules. A common structure:
- Bills under $500 → auto-post after OCR validation
- Bills $500–$5,000 → route to accounting manager
- Bills above $5,000 → require CFO approval
These rules enforce your internal controls without requiring anyone to manually monitor a queue.
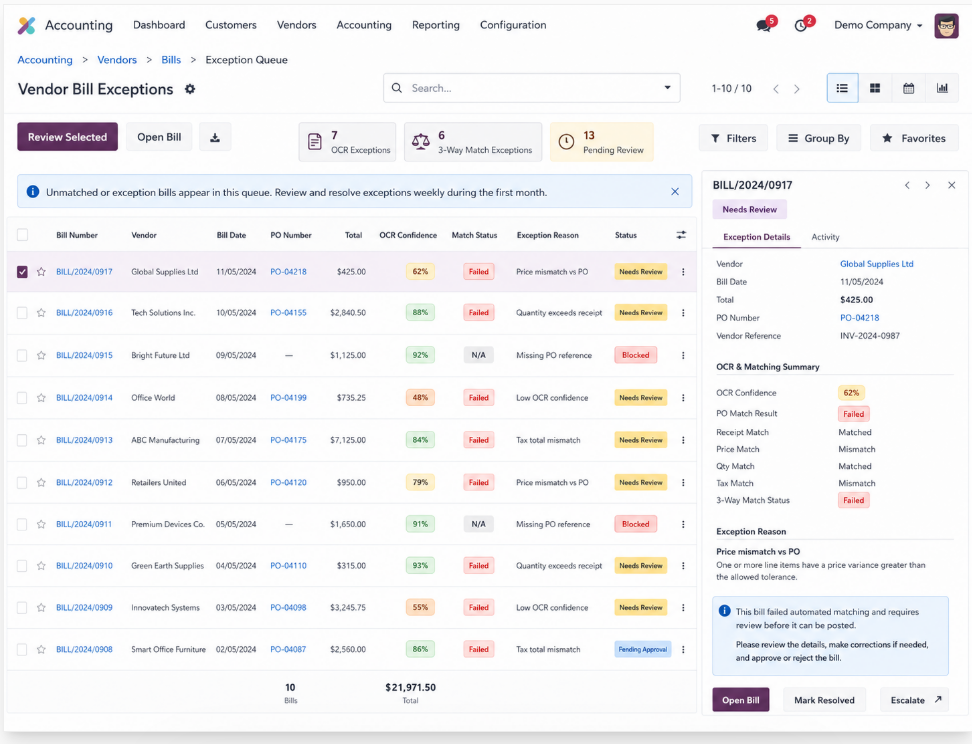
Step 6: Review the Exception Queue Weekly for Month One
Bills the system couldn’t match or that failed three-way matching appear in your exception queue. Resolve each one and use the patterns you see to refine your matching tolerance settings over time.
Automating Payment Reminders for Overdue Invoices
Odoo’s payment reminder automation detects overdue invoices daily and sends escalating email sequences based on the follow-up levels you configure in Accounting settings, with no manual tracking required.
Here’s how to set it up:
1.Go to Accounting → Configuration → Follow-up Levels and build your reminder sequence. We recommend three levels:
- Day 1 overdue: Friendly reminder, collegial tone, assumes an oversight. Re-attach the invoice PDF. Many late payments trace back to a lost email, not an unwilling customer.
- Day 15 overdue: Send a firmer message referencing your payment terms and any applicable late fees.
- Day 30 overdue: Final notice before escalation. At this stage, Odoo can automatically create a task for your collections manager, no manual handoff needed.
Each level uses a customizable email template. Odoo logs every reminder sent, giving your team a clean AR timeline when a dispute comes up.
2.Add payment links to every reminder email. Customers click “Pay Now,” review the invoice, and complete payment without logging into your portal.
Removing that friction shortens days sales outstanding consistently across every client we’ve implemented this for.
3.Escalate to your team automatically. Configure thresholds like: “If invoice remains unpaid 45 days past the final reminder, create a task for the collections manager” or “If a customer has 3+ overdue invoices totaling $10,000+, alert the CFO.” You define the rules once. Odoo runs them every day.
Cost Analysis: Is Odoo Invoice Automation Worth It?
Yes, for businesses processing 50+ invoices per month. The math is straightforward: automation costs $112–$160/month for most SMB setups and replaces $800–$1,400/month in manual invoicing labor.
Here’s the full cost breakdown:
- Community Edition: Free. Includes basic sales invoice automation. No OCR, no recurring scheduler, no advanced automation. Implementation cost is your time; budget 20–30 hours for a basic setup.
- Enterprise Edition: $31.10 per user per month (2025 pricing, annual commitment). Includes recurring invoicing, advanced approval workflows, native payment integrations, bank synchronization, and Odoo Studio.
- OCR scanning: $0.10 per invoice through IAP credits. 300 bills/month = $30. 1,000 bills/month = $100. No unlimited tier, costs scale directly with volume.
- Implementation: A DIY setup takes 40–60 hours to complete an accounting automation configuration. Professional implementation through an Odoo-certified consultant typically runs $2,000–$10,000, depending on integration complexity, custom workflows, and the number of automation rules required.
Run the ROI calculation against your own numbers:
| Your variable | Input |
|---|---|
| The number of hours per week your team spends on invoice tasks | ___ hrs |
| Fully-loaded hourly cost of that time | $___ |
| Monthly invoicing labor cost (hours × rate × 4.3) | $___ |
For a team spending 10 hours per week at $35/hour fully loaded: $1,505/month in invoicing labor. Enterprise licensing for two users plus OCR for 500 bills: ~$112/month. That’s a 93% reduction in invoicing labor cost.
From our client work, businesses moving from fully manual to automated invoice processing reduce their invoicing labor cost by 70–85%, with the automation paying for itself within the first full billing cycle after proper configuration.
Troubleshooting: Why Your Odoo Invoice Automation May Not Be Working
If your Odoo invoice automation isn’t working, check these five failure modes first; they account for the majority of issues we see in new implementations.
Problem 1: Invoices aren't generating after payment
Check that the “Automatic Invoice” toggle in Settings → Sales → Invoicing is enabled. This is the master switch; everything else depends on it.
If that’s on, check that your payment provider is correctly configured in Settings → Payment Providers.
Odoo won’t generate invoices unless it receives payment confirmation events from your gateway.
Problem 2: Invoicing policy mismatch
If invoices generate but show incorrect quantities or fire at the wrong time, your invoicing policy is likely misconfigured. “Invoice what is ordered” fires on order confirmation. “Invoice what is delivered” waits for delivery validation.
Check your settings under Settings → Sales → Invoicing, and confirm they match your actual business model.
Problem 3: OCR credits depleted
If vendor bill digitization suddenly stops working, check your IAP credit balance under Settings → Odoo IAP → View My Services.
OCR processing fails silently when credits hit zero; there’s no automatic alert unless you configure one. Set a low-balance notification in your IAP account settings to prevent unexpected gaps.
Problem 4: Recurring invoices are not generating
Two common causes: (a) the Subscriptions module is not installed, recurring invoices require it, not just the base Accounting module; (b) the contract’s end date has passed.
Check the contract in Accounting → Customers → Recurring Invoices, and verify that the status shows “In Progress” and that the next invoice date is set correctly.
Problem 5: Payment reminder emails are not sending
Go to Accounting → Configuration → Follow-up Levels and confirm that at least one follow-up level exists with an active email template. Then verify the “Send Automatically” toggle is enabled on each level. Reminder emails that appear configured but never send are almost always caused by this toggle being off, or by an email template referencing a variable that returns null for a specific customer record.
Conclusion
Manual invoicing drains your finance team’s time, accuracy, and capacity for higher-value work. Odoo’s invoice automation replaces that drain with a system that runs on rules you set once.
Start with sales invoice automation to eliminate manual AR entry. Add OCR-powered vendor bill processing to recover AP time. Set up payment reminders to protect cash flow. Connect your bank feed to close the reconciliation loop.
Each layer compounds the value of the one before it.
If your team is still manually keying invoices or chasing late payments, the bottleneck isn’t the technology; it’s the decision to keep doing it manually. Configure automation once, monitor the first few cycles carefully, and let Odoo handle the routine while your accounting function focuses on margins, forecasting, and strategy.
Ready to find out exactly what your Odoo setup needs?
Book a free consultation call with our certified CPA team, no obligation, no sales pitch. Just a straight answer on what you can configure yourself and where a professional setup saves real time.
FAQs
1. Does Odoo invoice automation work with Community Edition?
Partially. Community Edition supports automatic invoice generation from confirmed sales orders, which is the core AR automation. What it excludes: recurring invoice scheduling, OCR-powered vendor bill scanning, native Stripe/PayPal integration, and bank synchronization. If those features are essential to your workflow, Enterprise is the right starting point.
2. How much does Odoo OCR invoice scanning cost?
Odoo charges $0.10 per invoice scanned through its IAP credit system. There’s no monthly subscription or unlimited tier; you pay for what you scan. 200 vendor bills per month cost $20. 1,000 bills cost $100. Credits are purchased directly within Odoo in blocks.
3. Can Odoo automatically send invoices to customers?
Yes, once Automatic Invoice is enabled and your email template is configured, Odoo creates, posts, and emails invoices to customers upon payment confirmation, with no manual steps required. Recurring invoice contracts are also sent automatically on each billing cycle when auto-send is toggled on.
4. What is three-way matching in Odoo?
Three-way matching compares three documents for every vendor bill: the original purchase order, the goods receipt confirming delivery, and the vendor’s invoice. If amounts, quantities, or vendor details don’t match within your configured tolerance, Odoo routes the bill to a review queue rather than posting it automatically. It’s one of the most important AP internal controls Odoo offers, and it runs without anyone having to manually check anything.
5. Can I automate invoices in Odoo without Enterprise?
Yes, Community Edition can handle customer invoicing from sales orders. However, for recurring scheduling, vendor bill scanning, advanced approval workflows, and bank synchronization, you need Enterprise Edition or a third-party app from the Odoo App Store. Whether you should upgrade depends on how many invoices you have and how much manual processing those features can reduce.
6. How long does it take to set up Odoo invoice automation?
A straightforward sales order → invoice setup takes 3–5 hours, including testing. A full implementation covering sales invoicing, OCR, recurring invoices, approval routing, bank sync, and payment reminders takes 40–60 hours DIY or 1–2 weeks with a consultant. The difference isn’t complexity, it’s the number of modules that need to work together correctly from day one.